This is the Guidance Gate. A place to guide those who would defile this tomb to their deaths.
--Grail tablet for the Guidance Gate
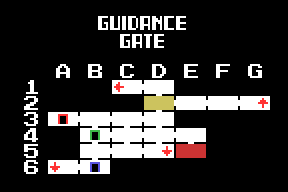
The Guidance Gate (導きの門, Michibiki-no Mon) is a field within the ruins. It is the first field the player will access. As the name implies, the Guidance Gate is intended to teach the player about many different features of the ruins.
Go to the left-side of the room and put a weight on the dais/pedastol this will open the chest on the right-side of the room. You can now get the Guidance Gate Map.
Shuriken[]
Location: F-2
Enter F-2 and jump to the top-most platform and head right once in G-2 head down the first ladder you see and then go left until you fall down. Once on the lower platform jump down on to the spikes, don't worry they are fake, after this put a weight on the dias/pedastol. You can now get the Shuriken.
Life Jewel[]
Location: D-1
Enter the room from the left, jump up to the platform above and walk to the right. This will cause you to walk over the switch which will open the chest. You can now get the Life Jewel.
Ankh Jewel[]
Location: D-5
Go to A-6 and break the statues in this order; Sword, Shield, Helmet, Armour. This will cause a ladder to form in the room to the right. Climb the ladder and stand on the switch, this will make a dais/pedestal appear in D-5, go to this room. Now place a weight on the dais/pedestal this will open the chest. Jump up to the platform above and push the block out the way then go down the ladder. You can now get the Ankh Jewel.
Grail[]
Location: B-4
Go to E-4 and go to the right wall, walk past the skeleton leaning against the wall and you will go through the wall which will take you to B-4. Now you can push the block in front of you on to the switch, the chest on the otherside of the room will open. You can now get the Grail.
Cross[]
Location: E-2
Get the Birth Seal (if you do not have it look at the Seals page.) Jump into the seal in the room, this will reveal an upper inaccessible part of the Guidance Gate. Use the Flares to kill all three of the Ant-Lions, this will open the chest. You can now get the Cross.
Treasure[]
Location: C-1
Get the Pepper from the skeleton in the Confusion Gate. Go to the face in the background and jump in front of the face, he will sneeze out the item. You can now get the Treasure.
ROMs[]
Athletic Land[]
Location: D-1
Scan the skeleton at the bottom-right corner of the room.
Konami Tennis[]
Location: F-2
Scan the skeleton at the bottom-left corner of the room.
Hyper Rally[]
Location: G-2
Follow the steps in Secrets - Inaccessible Area in G-2. Once you are in the inaccessible area read the broken tablet.
Mahjong Dojo[]
Location: C-5
Scan the 4th skeleton when counting from the right.
Game Master 2[]
Location: A-3
Enter the room from the Confusion Gate and head to the right, press the switch on the platform and then carry on going right. Once in B-3 head down the new ladder and go to the chest in A-3 that was previously a trap. Place a weight on the dais/pedestal and this time it will open the chest.
Game Collection EX[]
Location: D-4
Using the Grapple Claw, jump from the rightmost wall at C-4 and land on top of and examine the third angel statue at the bottom-left corner of D-4.
Puzzles[]
Making the ankh appear[]
Location: B-3 C-3 and D-3
Go to B-3 and push the block to the left until it goes on the switch. Then use the elevator to jump to the platform on the left, from there jump on to the platform to the right and break the pot blocking the ladder. Go down and put a weight on the dais/pedestal. Then head up the ladder and jump to the right, into C-3 you will land on an invisible floor. Use a weight on the dais/pedestal in the middle of the room and keep going right until you reach D-3 now head down the ladder and put a weight on that dais/pedestal.
Finishing this puzzle causes the Ankh to appear in the boss room.
Elevator[]
Location: C-4
Go to C-4, there will be a face in the background, however, this face has a green gem in its mouth. Jump up and whip the gem, this will cause the elevator that goes from B-3 to B-5 to start working.
Opening the boss room[]
Location: D-4 and E-4
Go to D-4 and kill all the enemies in the room. This will cause a block to spawn in E-4 which will allow you to solve that block puzzle. Go to E-4 once there push the bottom-right block to the right and off the edge of the platform, it should land on the statues head, then do the same with the bottom-left block; They should now both be stacked on top of each other. Now go to the top-most block and push it to the right as well, keep pushing until it falls to the lower platform and then pushes it off of there, to the right. If done correctly it should land on the switch which will cause a dais/pedestal to appear in the top-right corner of the room, place a weight on it; A ladder should appear at the bottom of the room, the boss room is down it.
If a weight has not been placed on the dais at D-3 (see 'Making the ankh appear' above) then the room will be empty save for two bats. If that puzzle has been completed the room will contain an ankh; use an ankh jewel on it to start the fight against Amphisbaena.
Traps[]
Falling Jaw[]
Location: D-3
There is a face in the background with a dais/pedestal underneath, that is surrounded by skeletons. If you place a weight on the dais/pedestal then the jaw of the face will fall on you.
Floor Spikes[]
Location: G-2
At the bottom-right of the room there is a pit with a skeleton in, if you go down there spikes will shoot up from the floor. If you do fall down you can avoid damage by getting to the ground under the ladder because no spikes shoot up there.
Death Pit[]
Location: C-4 and C-5
If you fall down the hole under the face in C-4 you will land in C-5. Once you land spikes will jump out of the floor, only in the center of the room. They can be avoided if you jump out the way quickly. The spikes do not trigger if you enter the room from anywhere else.
Rigged Chest[]
Location: A-3
There is a chest on the bottom-left corner of the room, if you place a weight on the dais/pedestal, spikes will shoot out of the ground. It can be avoided if you quickly jump to the sides.
Secrets[]
Loop on Floor Four[]
Location: E-4 and B-4
There is a skeleton on the right side of the room at E-4, walk past him and you will go through the wall. This will take you to B-4. Once you have moved the block in B-4 this shortcut will work both ways.
Inaccessible Area in G-2[]
Location':' C-3 and G-2
Go up on to the invisible platform in C-3 head to the center platform and go up the ladder. This will take you out to an area in G-2 that is otherwise inaccessible. This shortcut is only one way so once you go to G-2 you cannot head back to C-3.
Shops[]
Shop B-6[]
Go to A-6, unlock this shop by using the Conception Seal. Jump into the seal on the wall, this will cause the wall to your right to break, now heaf through to B-6. You can now enter the shop.
